前田稔(Maeda Minoru)の超初心者のプログラム入門
![]()
![]()
| ファイル名 | 説明 |
|---|---|
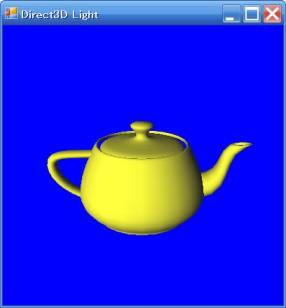
| EmptyProject.cs | ティーポットを描画 |
![]()
        private Framework sampleFramework = null;
        private Mesh    mesh = null;
        private float   aspectRatio = 1.0f;
|
        private void OnCreateDevice(object sender, DeviceEventArgs e)
        {
            mesh = Mesh.Teapot(e.Device);
        }
|
        private void OnResetDevice(object sender, DeviceEventArgs e)
        {   SurfaceDescription desc = e.BackBufferDescription;
            aspectRatio = (float)desc.Width / (float)desc.Height;

            //☆ マテリアルとライトを設定する
            System.Drawing.Color col = System.Drawing.Color.White;
            Microsoft.DirectX.Direct3D.Material mtrl = new Microsoft.DirectX.Direct3D.Material();
            mtrl.Diffuse = col;
            mtrl.Ambient = col;
            e.Device.Material = mtrl;

            e.Device.Lights[0].Type = LightType.Directional;
            e.Device.Lights[0].Diffuse = System.Drawing.Color.DarkTurquoise;

            e.Device.Lights[0].Direction = new Vector3(50.0f, -40.0f, 100.0f);
            e.Device.Lights[0].Enabled = true;
            e.Device.RenderState.Ambient = System.Drawing.Color.FromArgb(0x202020);
        }
|
        public void OnFrameMove(Device device, double appTime, float elapsedTime)
        {   device.Transform.View = Matrix.LookAtLH(new Vector3(0.0f, 2.0f, -7.0f),
                new Vector3(0.0f, 0.0f, 0.0f), new Vector3(0.0f, 1.0f, 0.0f));
            device.Transform.Projection = Matrix.PerspectiveFovLH((float)(Math.PI / 4), aspectRatio, 1.0f, 500.0f);
        }
|
        public void OnFrameRender(Device device, double appTime, float elapsedTime)
        {   bool beginSceneCalled = false;

            // Clear the render target and the zbuffer
            device.Clear(ClearFlags.ZBuffer | ClearFlags.Target, 0x002D32AA, 1.0f, 0);
            try
            {   device.BeginScene();
                beginSceneCalled = true;
                mesh.DrawSubset(0);
            }
            finally
            {   if (beginSceneCalled)   device.EndScene();  }
        }
|
        public void OnFrameMove(Device device, double appTime, float elapsedTime)
        {
            //device.Transform.World = Matrix.RotationY(Environment.TickCount / 1000.0f);
            device.Transform.View = Matrix.LookAtLH(new Vector3(0.0f, 2.0f, -7.0f),
                new Vector3(0.0f, 0.0f, 0.0f), new Vector3(0.0f, 1.0f, 0.0f));
            device.Transform.Projection = Matrix.PerspectiveFovLH((float)(Math.PI / 4), aspectRatio, 1.0f, 500.0f);
        }
|
![]()
| using System.Windows.Forms; |
static MainMenu menu = null;
|
        public EmptyProject(Framework f)
        {   sampleFramework = f;

            // メインメニューを生成
            menu = new MainMenu();
            MenuItem item = menu.MenuItems.Add("ファイル(&F)");
            item.MenuItems.Add(new MenuItem("終了(&X)", new EventHandler(this.FileExit), Shortcut.CtrlQ));
            item = menu.MenuItems.Add("ヘルプ(&H)");
            item.MenuItems.Add(new MenuItem("バージョン情報(&A)...", new EventHandler(this.HelpAbout)));
        }
|
    //sampleFramework.CreateWindow("EmptyProject");
    sampleFramework.CreateWindow("EmptyProject",null,menu,-1,-1);
|
        // ファイル/終了メニューのイベントハンドラ
        private void FileExit(object sender, EventArgs e)
        {
            sampleFramework.Dispose();
        }

        // ヘルプ/バージョン情報メニューのイベントハンドラ
        private void HelpAbout(object sender, EventArgs e)
        {
            MessageBox.Show("Project Menu Ver 1.0  Maeda Minoru");
        }
|
    public void CreateWindow(string windowTitle, System.Drawing.Icon icon,
        System.Windows.Forms.MainMenu menu, int x, int y)
    {
            ・
            ・
            ・
        // Store the window title
        State.WindowTitle = windowTitle;
        renderWindow.Text = windowTitle;

        //+++ 追加するコードです
        if (menu != null)
        {
            State.Menu = menu;
            renderWindow.Menu = menu;
        }
|
![]()
private ModelViewerCamera camera = new ModelViewerCamera();
|
        private void OnResetDevice(object sender, DeviceEventArgs e)
        {
            SurfaceDescription desc = e.BackBufferDescription;
            float aspectRatio = (float)desc.Width / (float)desc.Height;
            camera.SetViewParameters(new Vector3(0.0f, 2.0f, -7.0f), Vector3.Empty);
            camera.SetProjectionParameters((float)Math.PI / 4, aspectRatio, 1.0f, 500.0f);
            camera.SetWindow(desc.Width, desc.Height);

            //☆ マテリアルとライトの設定が続きます
                ・
                ・
|
        public IntPtr OnMsgProc(IntPtr hWnd, NativeMethods.WindowMessage msg, IntPtr wParam, IntPtr lParam, ref bool noFurtherProcessing)
        {
            // Pass all remaining windows messages to camera so it can respond to user input
            camera.HandleMessages(hWnd, msg, wParam, lParam);
            return IntPtr.Zero;
        }
|
        static int Main()
        {
                    ・
                    ・
                // 次の一行を追加します
                sampleFramework.SetWndProcCallback(new WndProcCallback(sample.OnMsgProc));

                sampleFramework.SetCallbackInterface(sample);
                try
                {
                    ・
                    ・
|
        public void OnFrameRender(Device device, double appTime, float elapsedTime)
        {
            bool beginSceneCalled = false;

            device.Transform.World = camera.WorldMatrix;
            device.Transform.View = camera.ViewMatrix;
            device.Transform.Projection = camera.ProjectionMatrix;

            // Clear the render target and the zbuffer
            device.Clear(ClearFlags.ZBuffer | ClearFlags.Target, 0x002D32AA, 1.0f, 0);
            try
            {
                device.BeginScene();
                beginSceneCalled = true;
                mesh.DrawSubset(0);
            }
            finally
            {   if (beginSceneCalled)   device.EndScene();  }
        }
|
![]()