前田稔(Maeda Minoru)の超初心者のプログラム入門
![]()
![]()
| ファイル名 | 説明 |
|---|---|
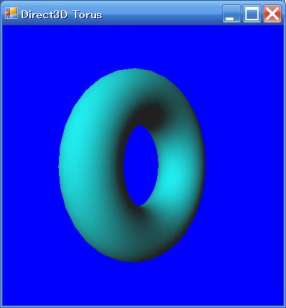
| DXLight.cs | トーラスをライトで照らす |
    bool InitializeGraphics()
    {
        try
        {
            presentParams.Windowed = true;
            presentParams.SwapEffect = SwapEffect.Discard;
            presentParams.EnableAutoDepthStencil = true;
            presentParams.AutoDepthStencilFormat = DepthFormat.D16;

            // Create the D3DDevice
            device = new Device(0, DeviceType.Hardware, this, CreateFlags.SoftwareVertexProcessing, presentParams);
            device.DeviceReset += new System.EventHandler(this.OnResetDevice);
            this.OnResetDevice(device, null);
            pause = false;
        }
        catch (DirectXException)
        {
            return false;
        }
        return true;
    }
|
    public void OnResetDevice(object sender, EventArgs e)
    {
        Device dev = (Device)sender;

        dev.RenderState.ZBufferEnable = true;  // Turn on the zbuffer
        dev.RenderState.Lighting = true;       // make sure lighting is enabled
        //☆ トーラスメッシュの生成
        mesh = Mesh.Torus(device, 16.0f, 40.0f, 32, 32);
    }
|
    private void SetupLights()
    {
        System.Drawing.Color col = System.Drawing.Color.White;
        Direct3D.Material mtrl = new Direct3D.Material();
        mtrl.Diffuse = col;
        mtrl.Ambient = col;
        device.Material = mtrl;

        device.Lights[0].Type = LightType.Directional;
        device.Lights[0].Diffuse = System.Drawing.Color.DarkTurquoise;
        //☆ ライトの座標を設定する
        device.Lights[0].Direction = new Vector3(50.0f, -40.0f, 100.0f);
        device.Lights[0].Enabled = true;    //turn it on

        //Ambient light is light that scatters and lights all objects evenly
        device.RenderState.Ambient = System.Drawing.Color.FromArgb(0x202020);
    }
|
    void SetupMatrices()
    {   device.Transform.World = Matrix.RotationY(Environment.TickCount / 1000.0f);
        device.Transform.View = Matrix.LookAtLH(new Vector3(0.0f, 3.0f, -200.0f),
            new Vector3(0.0f, 0.0f, 0.0f), new Vector3(0.0f, 1.0f, 0.0f));
        device.Transform.Projection = Matrix.PerspectiveFovLH((float)(Math.PI/4), 1.0f, 1.0f, 500.0f);
    }
|
    private void Render()
    {
        if (device == null) return;
        if (pause)          return;

        device.Clear(ClearFlags.Target | ClearFlags.ZBuffer, System.Drawing.Color.Blue, 1.0f, 0);
        //Begin the scene
        device.BeginScene();
        // Setup the lights and materials
        SetupLights();
        // Setup the world, view, and projection matrices
        SetupMatrices();
        // Draw the mesh subset
        mesh.DrawSubset(0);
        //End the scene
        device.EndScene();
        device.Present();
    }
|
![]()
| device.Lights[0].Diffuse = System.Drawing.Color.DarkTurquoise; |
| device.Lights[0].Diffuse = System.Drawing.Color.FromArgb(0xF0F020); |
| device.Lights[0].Direction = new Vector3((float)Math.Cos(Environment.TickCount / 250.0f), 1.0f, (float)Math.Sin(Environment.TickCount / 250.0f)); |
![]()
| 引数 | 説明 |
|---|---|
| device | デバイスの指定 |
| 50.0f | 正多角形の一辺の長さ |
| 6 | 多角形の角数 |
| 引数 | 説明 |
|---|---|
| device | デバイスの指定 |
| 20.0f | X軸方向の長さ(Width) |
| 40.0f | Y軸方向の長さ(Height) |
| 60.0f | Z軸方向の長さ(Depth) |
| 引数 | 説明 |
|---|---|
| device | デバイスの指定 |
| 30.0f | 底面の半径 |
| 0.0f | 上面の半径(ゼロのとき円錐) |
| 80.0f | 円柱の高さ |
| 32 | 回転方向の分割数 |
| 32 | Z軸方向の分割数 |
| 引数 | 説明 |
|---|---|
| device | デバイスの指定 |
| 50.0f | 球の半径 |
| 32 | Y軸回転方向の分割数 |
| 32 | Y軸方向の分割数 |
| 引数 | 説明 |
|---|---|
| device | デバイスの指定 |
| 16.0f | トーラスの太さ |
| 40.0f | トーラスの外側の半径 |
| 32 | 上下方向の分割数 |
| 32 | 回転方向の分割数 |
| 引数 | 説明 |
|---|---|
| device | デバイスの指定 |
![]()