
        // treeView1
        this.treeView1.BackColor = System.Drawing.SystemColors.ControlLight;
        this.treeView1.ContextMenuStrip = this.contextMenuStrip2;
        this.treeView1.Dock = System.Windows.Forms.DockStyle.Fill;
        this.treeView1.LabelEdit = true;
        this.treeView1.Location = new System.Drawing.Point(0, 0);
        this.treeView1.Name = "treeView1";
        this.treeView1.Size = new System.Drawing.Size(257, 486);
        this.treeView1.TabIndex = 0;
        this.treeView1.AfterLabelEdit +=
            new System.Windows.Forms.NodeLabelEditEventHandler(this.treeView1_AfterLabelEdit);
        this.treeView1.AfterSelect +=
            new System.Windows.Forms.TreeViewEventHandler(this.treeView1_AfterSelect);

        // Title
        this.Title.BackColor = System.Drawing.SystemColors.GradientInactiveCaption;
        this.Title.Font = new System.Drawing.Font("MS UI Gothic", 11F,
            System.Drawing.FontStyle.Regular, System.Drawing.GraphicsUnit.Point, ((byte)(128)));
        this.Title.Location = new System.Drawing.Point(257, 25);
        this.Title.Name = "Title";
        this.Title.Size = new System.Drawing.Size(935, 29);
        this.Title.TabIndex = 3;

        // MyForm
        this.ClientSize = new System.Drawing.Size(1178, 544);
        this.Controls.Add(this.Title);
|


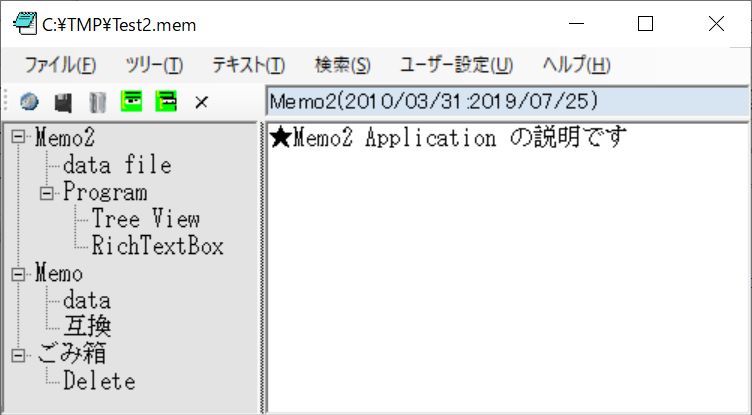
"c:\tmp\test2.mem/Memo/data" "C:\DATA\Memo\C#.mem/C#/99App/06Memo2" |
    string      MEMO_Path = @"c:\bin\memo2.exe";

    private void richTextBox1_DoubleClick(object sender, MouseEventArgs e)
    {
        int pos, rt, i;
        pos = richTextBox1.SelectionStart;
        for (; pos > 0; pos--)
        {
            for (i = 0; i < m_sep.Length && richTextBox1.Text[pos] != m_sep[i]; i++) ;
            if (i < m_sep.Length) break;
        }
        if (richTextBox1.Text[pos] == '"' || richTextBox1.Text[pos] == '\'')
        {
            for (rt = pos + 2; rt < richTextBox1.Text.Length; rt++)
            { if (richTextBox1.Text[pos] == richTextBox1.Text[rt])  break; }
        }
        else
        {
            for (rt = pos + 1; rt < richTextBox1.Text.Length; rt++)
            {
                for (i = 0; i < m_sep.Length && richTextBox1.Text[rt] != m_sep[i]; i++) ;
                if (i < m_sep.Length) break;
            }
        }
        if (pos >= 0) pos++;
        m_sou = richTextBox1.Text.Substring(pos, rt - pos);
        this.Text = "[" + m_sou + "]";
        Clipboard.SetDataObject(m_sou, true);

        if (File.Exists(m_sou))
        {   System.Diagnostics.Process.Start(m_sou);
            return;
        }
        if (String.Compare(m_sou.Substring(0, 5), "http:", true) == 0)
        {   System.Diagnostics.Process.Start(m_sou);
            return;
        }

        // m_sou の拡張子を調べる  "c:\tmp\test2.mem/Memo/data"
        pos = m_sou.IndexOf('.');
        if (pos<0)  return;
        if (String.Compare(m_sou.Substring(pos, 4), ".mem", true) != 0) return;
        System.Diagnostics.Process.Start(MEMO_Path, m_sou);
    }
|
    public MyForm()
    {
        InitializeComponent();
        this.Resize += new System.EventHandler(this.FormResize);
        this.Load += new System.EventHandler(MyForm_Load);
        this.FormClosing += new FormClosingEventHandler(Form_Closing);
    }
    public MyForm(string str)
    {
        InitializeComponent();
        this.Resize += new System.EventHandler(this.FormResize);
        this.Load += new System.EventHandler(MyForm_Load);
        this.FormClosing += new FormClosingEventHandler(Form_Closing);
        m_sou = str;
    }
|
    // アプリケーションの初期化
    private void MyForm_Load(object sender, System.EventArgs e)
    {
        Width = 1200;
        Height = 600;
        if (File.Exists(XML_File))  //ファイルの有無をチェック
        {
            System.Xml.Serialization.XmlSerializer serializer =
                new System.Xml.Serialization.XmlSerializer(typeof(XmlClass));
            System.IO.FileStream fs =
                new System.IO.FileStream(XML_File, System.IO.FileMode.Open);
            XmlClass obj = (XmlClass)serializer.Deserialize(fs);
            fs.Close();
            int point = (int)obj.point;
            m_font = new Font(obj.name, point);
            m_file = obj.file;
        }
        else m_font = new Font("MS 明朝", 12);
        richTextBox1.Font = m_font;
        richTextBox1.LanguageOption = RichTextBoxLanguageOptions.UIFonts;
        treeView1.Font = m_font;
        button1.Hide();
        textBox1.Hide();
        textBox2.Hide();

        if (m_sou=="Source")    m_sou = m_file;
        if (m_sou.IndexOf('/')<0)
        {   ReadFile(m_sou);
            m_file = m_sou;
            m_Idx = 0;
            treeView1.TopNode.Expand();
            richTextBox1.Text = (string)t_txt[0];
            this.Text = m_file;
            return;
        }

        // m_sou を解析
        string[] str;
        string[] str2;
        int      i,pt;
        str = m_sou.Split(new char[] {'/', '-'});
        ReadFile(str[0]);
        m_file = str[0];
        str2 = (string[])str.Clone();
        for (i = 1; i < str.GetLength(0); i++) str2[i] = "★" + str2[i];
        m_Idx = 0;
        pt = 1;
        for(i=0; i<t_ttl.Count; i++)
        {
            if ((string)t_ttl[i]==str[pt] || (string)t_ttl[i]==str2[pt])
            {
                m_Idx = i;
                pt++;
                if (pt>=str.GetLength(0))  break;
            }
        }
        treeView1.SelectedNode = (TreeNode)t_node[m_Idx];
        richTextBox1.Text = (string)t_txt[m_Idx];
        this.Text = m_sou;
    }
|
    // アプリケーションの初期化
    private void MyForm_Load(object sender, System.EventArgs e)
    {
        Width = 1200;
        Height = 600;

        if (!System.IO.Directory.Exists("C:\\tmp"))
        {   MessageBox.Show("C:\\tmp\\ のフォルダーを作成して下さい");
        }
        if (File.Exists(XML_File))  //ファイルの有無をチェック
        {
            ・・・
        }
|
    //  memo2.mem を切り分けて ArrayList に格納する
    private void ReadFile(string file)
    {
        StreamReader reader;
        string str;
        int    pt, wk;

        if (!File.Exists(file))     //ファイルの有無をチェック
        {
            MessageBox.Show("ファイルが見つかりません(新規データを作成)", file);
            CreateData();
            return;
        }
            ・・・
|
    private void NewFile(object sender, EventArgs e)
    {
        DialogResult rc;
        CheckText();
        if (m_UP)
        {
            rc = MessageBox.Show("保存しないで実行?", "選択", MessageBoxButtons.YesNo, MessageBoxIcon.Question);
            if (rc == DialogResult.No)  return;
        }
        CreateData();
    }
|
    private void CreateData()
    {
        string str = DateTime.Now.ToString();
        str = str.Substring(0,10) + ":" + str.Substring(0,10);
        t_lev.Clear();
        t_ttl.Clear();
        t_ymd.Clear();
        t_txt.Clear();
        t_lev.Add(2);
        t_ttl.Add("新規ファイル");
        t_ymd.Add(str);
        t_txt.Add("☆新規データ\nTest Data Type Input");
        t_lev.Add(2);
        t_ttl.Add("ごみ箱");
        t_ymd.Add(str);
        t_txt.Add("ごみ箱\n");
        t_node.Clear();
        treeView1.Nodes.Clear();
        m_Idx = 0;
        Set_TVFunc(treeView1, 2);
        m_Idx = 0;
        richTextBox1.Text = (string)t_txt[0];
        treeView1.ExpandAll();
        m_UP = false;
        richTextBox1.Modified = false;
        m_file = "c:\\tmp\\New.mem";
        this.Text = m_file;
    }
|
 ※・
※・